The most usual issues with Windows 10 is no sound. Particularly right away after updating from a previous version of Windows. However, large updates can also bring with them new complications and some of the most typical, are audio related. Windows 10 features a great deal of new drivers which might be resulting in sound not working. That’s not all though, as there are lots of other variables involved in not hearing audio in Windows 10, so there is no single answer to this issue.
A simple audio troubleshoot might be the solution, or you may need to completely uninstall and re-install audio drivers. There are several solutions and any solution could fix your Windows 10 no sound issue.
How to Fix No Sound on Windows
Check Connections
If you have external speakers, then there is a possibility that the connected wires are not connected correctly. Ensure that the wires are connected appropriately on both the PC’s and speaker’s end. Do remember that there are 2 jacks, one for sound input and one for output. Make sure that you are connecting the speakers to the output jack and not the input one made for microphones.
You Might Also Like: Fix – No Audio Output Device is Installed
Check Speaker Settings
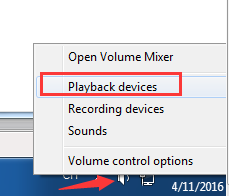
- Right-click the sound icon at the bottom right corner of your desktop and click Playback devices.
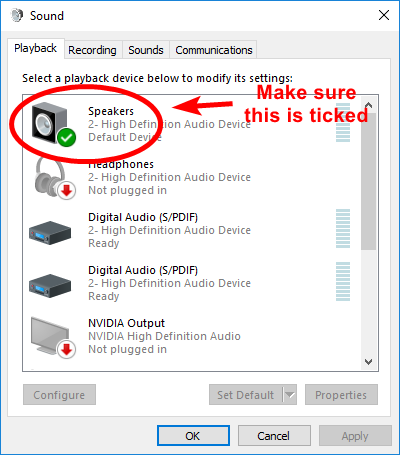
- In the Playback tab, ensure there’s a green tick on Speakers. This indicates that your speakers are the default playback device.
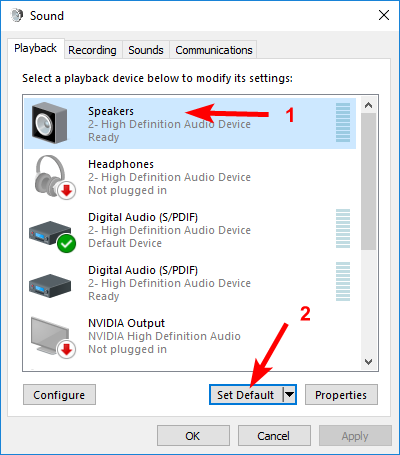
- If your Speakers are NOT already set as the default, this is no doubt your problem. To fix, just click them, click Set Default, then click OK and test whether you have sound.
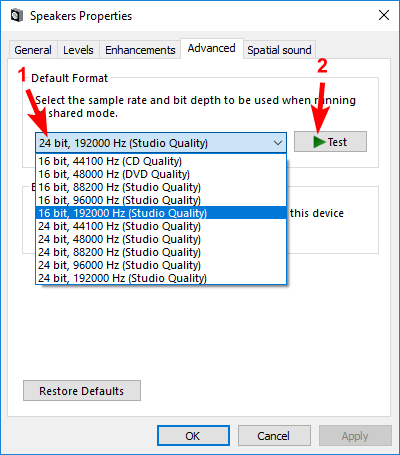
- If your Speakers are set as the default playback device, and you’re still not hearing any sound, you should experiment with different sound formats. To do this, click Speakers then Properties.
- Go to the Advanced tab, and in the Default Format section, select a different sample rate and bit depth, then click Test.
Windows Audio Troubleshooter
Windows includes an integrated troubleshooter to recognize and resolve problems like audio or network issues. There is a chance Windows 10 may be able to detect the problem and fix it; or at least let you know exactly what to do.
To run the troubleshooter, right-click on the sound icon in the taskbar and choose “Troubleshoot sound problems” from the menu. This will run the troubleshooter that will automatically scan the audio system to search for errors.
If it discovers any problems, it will let you know and might automatically fix it. If it does not repair it automatically, it will tell you exactly what the issue is then you can follow the instructions to resolve it yourself.
Update your Audio Driver
To fix audio issues in Windows 10, just open the Start and enter Device Manager. Open it and from a list of devices, find your sound card, open it and click on the Driver tab.
Now, select the Update Driver option. Windows must be able to take a look at the web and update your PC with the most recent sound drivers. If it fails to do so, you can find the ideal drivers at your PC manufacturer’s site.
Also Read: Microphone not Working in Windows 10
Disable and Restart Audio Services
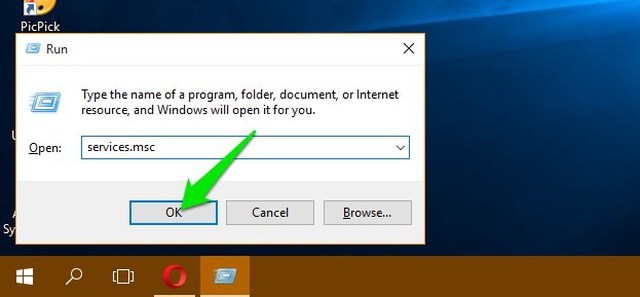
Disabling audio services yourself and re-enabling it may also fix the issue. To access Windows services,
- Press Windows+R keys to open Run and type service.msc to launch “Services”.
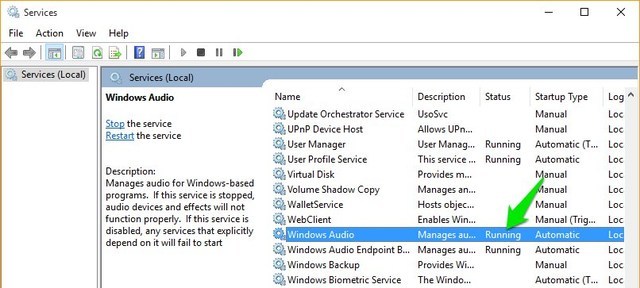
- Scroll down to Windows Audio service and make sure its status is set to “Running”. If not, right-click on it and choose Start from the menu to start the service.
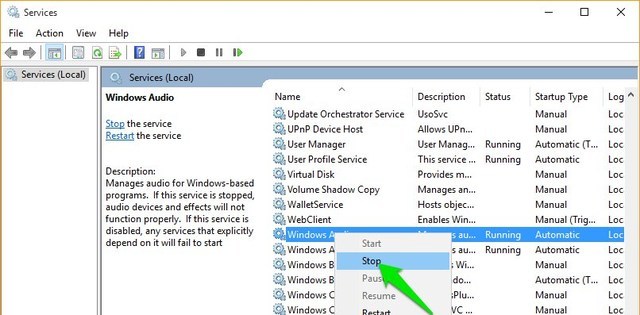
- There is a good chance it will be already running, but you need to restart it to see if it fixes the issue.
- Right-click on it and click on Stop to disable the service.
- Afterwards, right-click on it again and click on Start to enable the service.
Disable Audio Enhancement
Audio Enhancements are integrated Microsoft and third-party packages developed to make sure your systems particular audio hardware works perfectly. Besides when it does not. These very enhancements could be triggering your Windows 10 audio problem. Fortunately, they’re simple to turn off..
- In the taskbar search box type Sound, and click on the Sound Control Panel option.
- In the new box that opens, right-click the default device, and select Properties.
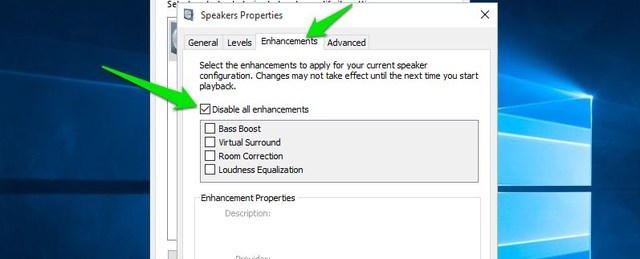
- Click the Enhancements tab, and make sure to check the box labelled Disable all enhancements, and Apply.
Update IDT High Definition Audio CODEC
A variety of systems might come across problems with their IDT High Definition Audio CODEC. This can be fixed with a manual driver update which permits us to select the sound driver we want to use.
- Left-click the Start menu and select Device Manager.
- Expand the Sound, video games and controllers
- If you spot IDT High Definition Audio CODEC, right-click and select Update Driver Software.
- In the next panel, select Browse my computer for driver software.
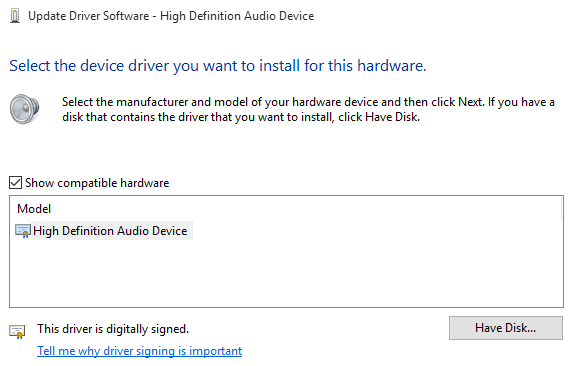
- Followed by Let me pick from a list of device drivers on my computer. This allows us to select from any drivers pre-installed on our system.
- Under Model, select High Definition Audio Device click Next, followed by Yes.
- You may need to restart your system for the changes to take effect.

 (55 votes, average: 4.36 out of 5)