When a file that is required by Windows Product Activation (WPA) is damaged or missing. This error would show up and most possible reasons for this happening are:
- A third-party anti malware application is interfering the Operating System installation.
- Manual modification of the file required by WPA.
So, let’s look forward to our methods that can be used to solve the issue.
Method 1: Uninstall Microsoft 6 to 4
You will have to uninstall Microsoft 6 to 4 devices in order to solve this issue. It might be possible that you might not see these files as these are hidden by default. Take a look at the steps.
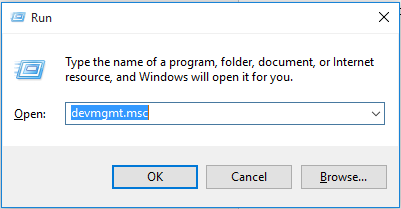
- Press Windows Key + R.
- Type devmgmt.msc in the box and press Enter.
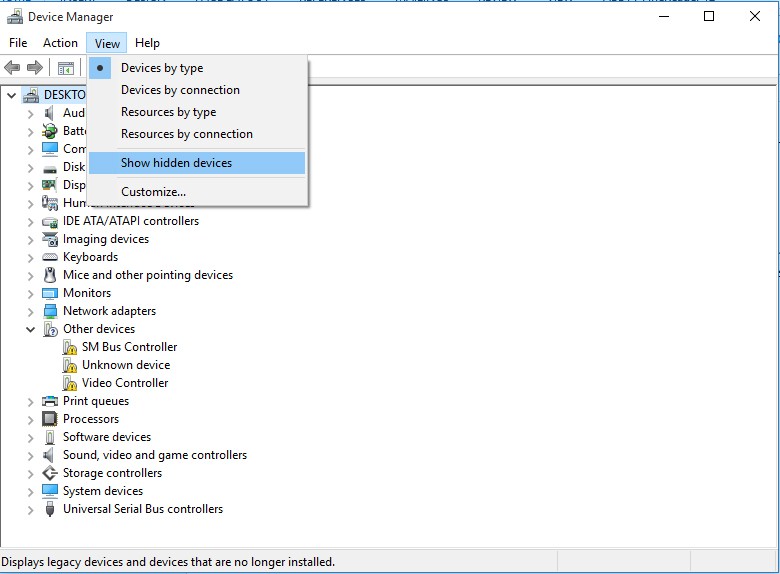
- Select Show Hidden Devices in the View dropdown.
- Double click on Network Adaptors
- Right click the Microsoft 6to4 deviceand select Uninstall. Repeat this step for all the Microsoft 6to4 devices you see in the list.
As soon as you are done with the procedure, restart your computer. This will most probab;y solve the issue.
Method 2: Repair the Installation
- Insert the Windows XP CD in the CD Drive.
- Restart your PC.
- As soon as you see the message “press a key to start your computer from the Windows XP CD” press any key to start from CD.
- Press R to start Recovery Console when the following message appears “To set up Windows XP now, press ENTER. To repair a Windows XP installation by using Recovery Console, press R. To exit Setup without installing Windows XP, press F3.
- When you see the numbered drives, select your primary drive by pressing the number opposite to that drive.
- Insert the Admin password when prompted and press enter.
- Type cd C:\WINDOWS\System32( or whichever your primary disk is ), and then press ENTER.
- Using REN command rename the following files.
Type REN File_Name.extensionFile_Name.old at the command prompt.
- dbl
- dll
- htm
Note:This file is located in the following subfolder: - oobe
- dll
- dll
- dll
- exe
- Type the drive letter of the CD drive together with a colon, and then press ENTER. For example, you type E:, and then press ENTER.
- Type cd i386, and then press ENTER.
- Type the following commands individually. Press ENTER after each command:
- Expand licwmi.dl_ C:\WINDOWS\System32
- Expand regwizc.dl_ C:\WINDOWS\System32
- Expand licdll.dl_ C:\WINDOWS\System32
- Expand wpabaln.ex_ C:\WINDOWS\System32
- Expand wpa.db_ C:\WINDOWS\System32
- Expand actshell.ht_ C:\WINDOWS\System32
- Copy pidgen.dll C:\WINDOWS\System32
- Type Exit, and then press ENTER to restart the computer.
Error 0x80004005 on a VirtualBox
This problem occurs due to registry key.
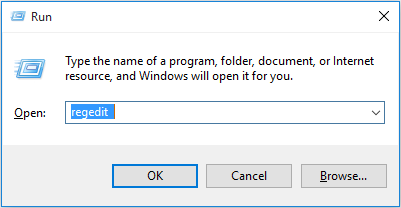
Press WIN + R, type regedit in the box and click OK.
Go to the following registry path:
HKEY_LOCAL_MACHINE\SOFTWARE\Microsoft\Windows NT\CurrentVersion\AppCompatFlags\Layers
“C:\Program Files\Oracle\VirtualBox\VirtualBox.exe”=”DISABLEUSERCALLBACKEXCEPTION”
If this key exists, delete it and try again. If deleting the key does not help, then try disabling your antivirus.
0x80004005 – Windows 10 Update Error
Method 1: Delete everything in Download Folder
Error 0x80004005 sometimes show up because the windows update file you downloaded might be corrupted.
- Open File explorer by double clicking This PC.
- Follow the path: C:\Windows\SoftwareDistribution\Download ( where C is the drive where the windows is installed).
- Select all files and folders and delete them.
- When everything is deleted, empty the recycle bin and then try again.
Method 2: Download and install updates manually
- Open any search engine.
- There type “Microsoft Windows update KBXXXXX download” where KBXXXXX is the KB code of the update you wish to install.
- Download the Windows 10 update. Please make sure the update is downloaded from the link to MS official site.
- Once download is done, you can double click it and follow the onscreen instruction to install it manually.


 (50 votes, average: 4.77 out of 5)